
FlatText
We LOVE SketchUp! But the text, not so much...
Because SketchUp text is a "face me" object, it jumps around and will not stay put as you orbit your model. And because no two apps show text the same way, it is hard to get WYSIWYG text output to printers or CAD. So we invented FlatText.
This is lettering done Old School - using precise vectors instead of fuzzy bitmaps.
No more cleaning up your exported text in CAD. You can set the colors of the text, leader lines, and arrowheads - perfect for controlling line weights, or just jazzing things up! FlatTexts can have solid backgrounds, so that your text blocks out the stuff behind it, making your drawing more readable. Select from five built-in fonts and four arrowhead styles.
NEW for version 4.3: CircleText. Make FlatText that follows a circular arc. Great for professional stamps, bottle caps, etc.
NEW for version 4.4: AutoTag. Select a layer (tag) and all new FlatTexts and FlatLeaders will automatically use that tag!
NEW for version 4.5: Stamp tool. Useful for making multiple copies of FlatText. Can increment text, for numbers or letters that increase with each click. A powerful tool for labeling column lines, room labels or part numbers!
Get FlatText on the Extension Warehouse or the SketchUcation Plugin Store.
Watch these videos to see FlatText and FlatLeader at work, or jump to How to Use.
FlatText Videos
FlatText Videos


Introducing Flat Text

FlatLeader Intro

Place Tool

Stamp Tool

Edge Tool

CircleText Demo

Edit Tool

Revise Tool

Adjust & Squeeze Tools

Prefs Tool

FL Place

FL Revise

FL Adjust

FL Prefs
FlatText ships with five built-in fonts. You can get free font packs with several more fonts here.
If you want more fonts, you can make some of your own! Here's how.
FlatText API: SketchUp developers can call FlatText from inside their own extensions. Here's how.
How It Works
FlatText assembles components called "Glyphs" into groups. A Glyph is just a bunch of lines (edges) that represent a letter, a number, a punctuation mark, or a symbol. A set of Glyphs is called a "Font." Since the resulting group of glyphs is completely flat, we call it a "FlatText."
The height of a typical Glyph is 12 inches (300 mm). To make your text larger or smaller, specify a Width Scale and a Height Scale other than 1.0. So, 0.5 makes the glyphs half the size, and 2.0 makes them twice the size.

Here is a typical FlatText group that's been opened for editing with all its glyphs selected. Because View->Hidden Geometry is checked (on), the space glyphs are also selected. Otherwise, they wouldn't be selected because they have no visible artwork, just a top line and a base line.

A "FlatLeader" is a group that contains a FlatText and a "leader line." The leader line consists of two edges and a optional arrowhead component. The leader lines and arrowhead are placed in the same 2D plane as the FlatText. Here is a FlatLeader group that's been opened for editing with all its parts selected:

Since FlatLeaders all contain FlatTexts, if you open one for editing (double-click on it), you get access to all the FlatText tools, such as Adjust and Squeeze. This lets you get those leader notes looking just the way you want!
How to Use FlatText and FlatLeader
After you install FlatText, there will be two new menu items in your Tools menu: "FlatText" and "FlatLeader."
There are also toolbars with buttons for many of the commands.
Here is the FlatText menu and toolbar:

Here is the FlatLeader menu and toolbar:

Jump to FlatLeader Menu Commands
FlatText Menu Commands
- Place in Model: This command acts like SketchUp's 3D Text tool. You can enter some text into a dialog box that looks like this:

The text field in the dialog is pre-loaded with a default message that you set in FlatText Preferences. You can edit this message as you would any text, including pasting text from your computer's clipboard.
When you hit the "OK" button, you will be back in your model with a phantom rectangle that shows you how big the FlatText group is, and where it will be placed when you click your mouse. Don't worry if it's not just right - you can move it around later, just like any other group, and you can change just about anything in the FlatText itself.
A FlatText is located in 3D space like this: The FlatText group will try to stick to a face if your cursor was on one when you placed it, or it will go to the ground plane (the red-green plane where the blue coordinate equals zero). It will be oriented in such a way that it is most readable from the point of view of the camera if on a vertical or sloped face, or parallel to the red axis if on the ground plane or a horizontal face.
Since FlatTexts stay put, they will rotate along with the model, instead of always facing you as you orbit.
Set View to FlatText: You can use this context menu command to reset the camera angle to look straight at the selected FlatText.
- Stamp in Model: This tool works like the Place tool, with two additions:
1. Unlike the Place tool, you don't have to reselect the tool for each FlatText you make. This tool will keep "stamping out" FlatTexts until you tell it to stop (hit spacebar, for instance).
2. Incrementing text: You can put simple "formulas" into the dialog box, between double brackets "<<" and ">>". Any text between the marks will get incremented each time you Stamp. For example, "#<<01>>" gives you #01, #02, #03... and "<<AA>>" gives you AA, AB, AC, etc.
Used together, these features make the Stamp tool a power tool for numbered items, such as building columns, rooms, or parts.
- Place on Edge: Use this tool when you need more accuracy in placing your FlatText. First, select an edge. The edge will be used as a guide for placing the FlatText. Next, call the Place on Edge command. A dialog box similar to the Place command dialog comes up where you can put your message.
When you hit the "OK" button, the newly created FlatText will be placed in the model, using the selected edge as a guideline for where to put the first line of the text. The length of the edge is used as the paragraph width of the text. The text will try to lie flat in the red-green plane unless the selected edge is vertical, in which case it will be placed in the red-blue plane. The starting point of the edge will be where the text starts, so if you draw an edge from right to left (as seen in a top view), the text will appear to be upside down. The best way to master this tool is to just play around with it. Once you get the hang of it, it's very useful for situations where you need a lot of accurately placed texts, such as in tables and schedules.
There is also a context menu command for Place on Edge. Right-click on an edge and you will see the command "FlatText on Edge" in the pop-up menu.
- Place on Circle: Use this tool to make circular FlatText ("CircleText") for things like professional stamps or logos. First, select a circle. Next, call the "Place on Circle" command. A dialog box comes up where you can enter your message and select other parameters, such as font, color and scale.
When you hit the "OK" button, the CircleText will be placed on the circle. The text must be one line only, and it must fit the circle's circumference. If it doesn't fit, the dialog box will return, so you can make adjustments. The text will lie flat on the circle. If you have the paid version of FlatText, you can use the Edit, Revise, Adjust, and Squeeze "Power Tools" on your CircleText. Use Adjust to interactively change the radius, and the Squeeze tool to interactively change the length of your CircleText. The CircleText video above shows this in action.
There is also a context menu command for Place on Circle. Right-click on a circle and you will see the command "FlatText on Circle" in the pop-up menu.
- Edit: This command brings up dialog box similar to the Place command dialog, except that it is pre-loaded with the message of the FlatText you are editing. Once you have finished editing the text, hit OK, and the selected FlatText's message will be changed to the new text. Also has a context menu if you right-click on a FlatText.
- Revise: Use this command to change things in a FlatText. Select the FlatText you want to revise and call this command. Up comes a dialog box that's pre-loaded with the characteristics of your selected FlatText:
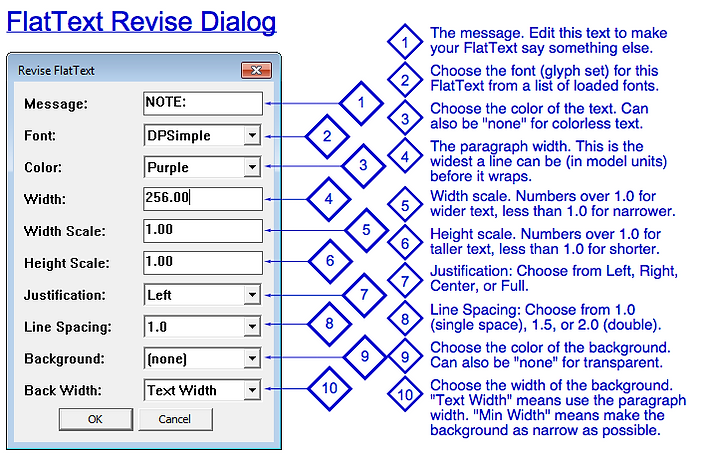
Here, you can change just about any aspect of your FlatText, as described in the illustration above. The best way to get a feel for this is to make a FlatText and then experiment with various settings. This command also has a context menu - right-click on a FlatText to see it.
Here is an illustration of Background Width, with the Background color set to yellow. It shows the difference between Text Width and Minimum Width:

Pro Feature "Multiple Revise": You can use this command on a selection of multiple FlatTexts. The dialog box is pre-loaded with the properties of all the selected FlatTexts. Only things that all the selected FlatTexts have in common will be displayed with their values. Things that vary among the selected FlatTexts will be pre-loaded with the word "varies." Any changes you make will be applied to all of the selected FlatTexts. If you change one of the "varies" fields to a specific value, all the selected FlatTexts will get that value. If you leave a "varies" field alone, that aspect of the selected FlatTexts will not be changed.
- CircleText Revise: Use this command to change things in a CircleText. Select the CircleText you want to revise and call this command. Up comes this dialog box:
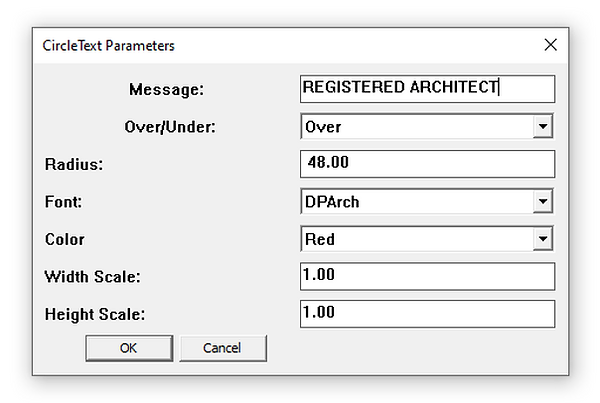
You can revise these parameters:
- Message: What the text will say. It must fit in one line that is shorter than the circle's circumference.
- Over/Under: Determines whether the text will flow over the top or under the bottom of the circle.
- Radius: The radius of the CircleText, measured to the middle of the glyphs.
- Font: The font of the CircleText. Any of the FlatText fonts may be used.
- Color: The color of the CircleText.
- Width and Height Scales: You can adjust these to make your text better fit the circle.
CircleTexts are always center-justified, have a line spacing of 1.0, and do not use background color.
- Adjust: The Adjust tool is an interactive way to revise the Width setting. To use it, select a FlatText and call this command. A red dashed outline appears around the FlatText and the cursor changes to left/right arrows. Click and drag to change the width of the rectangle. The rectangle will automatically get taller or shorter as FlatText rewraps the text. Release the mouse button to see the adjusted FlatText.
On CircleText, Adjust changes the radius of the text.
- Squeeze: The Squeeze tool also interactively changes the width of a FlatText, but instead of rewrapping the FlatText, Squeeze changes the Width Scale, so that all the glyphs in the FlatText get wider or narrower. This can be very handy if a FlatText must fit inside a constrained space, and word wrapping would make it too tall.
On CircleText, Squeeze changes the circumference of the text.
Watch the "Adjust and Squeeze" video to see these two tools in action. Watch the CircleText video to see them working on CircleText. Both of these tools also show up in the context menu if you right-click on a FlatText or CircleText.
- Find and Replace: This command works like you would expect. In the dialog box, give it some text to find and the text you want to replace it with, then hit "OK." When the command finishes, yo will get a results message saying how many replacements were made.

If you select one or more FlatTexts, this command works on just those selected. If no FlatTexts are selected when you call this command, it will work on all FlatTexts in the model, visible or not. Its always a good idea to look carefully at the results message to ensure that the number of replacements is what you expected!
Find and replace does not work on CircleText, because I don't think that users will generally want it to. Feel free to contact me if you disagree!
- Preferences: The Preferences command uses a similar dialog box as the Revise command, except the values you are editing are the default properties for any new FlatText you make.
A shortcut to set up your Preferences is to select a FlatText that has the settings you want, then call the Preferences command. A message appears asking if you want to use the selected FlatText to set preferences. Click on "Yes" and the Preferences dialog will be populated with the properties of the selected FlatText. This is a handy way to quickly change between different text styles in a model. There's also a context menu; just right-click on the FlatText you want to use to set your preferences.
Types of Preferences
The topic of preferences is actually a bit complicated. There are Factory Preferences, Model Preferences, and Custom Default Preferences.
Factory Preferences: When you first install FlatText, these are the preferences you will see. As of this writing, the default message is "This is some Flat Text" in DPArch font, single spaced lines, center justified in a 128.0 paragraph Width, no text material, no background material, width and height scales set to 1.0. Any new model will start with these preferences, unless you save different preferences as your Defaults, as described below.
Model Preferences: When you run the Preferences command and hit "OK", the choices you made are stored in the model you are working on. All FlatTexts you make after that will use these Model Preferences. Every model has its own set of FlatText preferences, so when you switch between models, the preferences change with the model (or become the defaults if the model has no stored preferences).
Custom Default Preferences: Maybe you don't want every new model to start out with "This is some Flat Text" in DPArch font. Using the Save Prefs as Default command, described below, you can change the default preferences to something else. For example, I have my defaults set to: "NOTE:" in Purple DPSimple font, single spaced and left justified in a 256 inch wide paragraph with no background color, scales 1.0.
- Select All FlatText: This command will select all FlatTexts that are in visible layers (or tags as of 2020). Handy for grabbing all the FlatText notes you just made, so you can move them to a certain layer (or tag).
- Save Prefs as Default: This is the command that sets up your Custom Default Preferences (described above). It reads the model's preferences and writes them to a file named "FTprefs.txt". Now, any new model you start will use these preferences. Your model must have preferences stored in it for this command to work. If it doesn't, you will get a message asking you to store your preferences (using the Preferences command) first.
- AutoTag Settings: Tells the FlatText extension which tag (layer) to assign to a newly-made FlatText or FlatLeader object. You may select any tag in your model, or "(default)", which will assign the active tag. This setting is saved with your model (SketchUp file), so it can be different for different models. You can change this setting at any time, and it will be saved between modeling sessions.
- About FlatText: Takes you to this web site.
- License...: Shows you the status of your FlatText license.
FlatLeader Menu Commands
- Place Leader: This tool works like SketchUp's native Text tool making a leader note. As you move the cursor around, you will see some "preview text" that moves around with it, showing you what the FlatLeader's message will say if you click the mouse. The message can be the area of a face, the length of an edge, the coordinates of a point, or the name of an object. If no message can be found, a default message is used instead.
The tools works two ways, Click-Drag and Click-Click:
- Click-Drag: Click and hold the mouse button down to drag out a leader, then release.
- Click-Click: Click and release the mouse button, move the mouse, and click again.
Either way, you will see a preview of the FlatLeader that consists of the leader line and a rectangle showing the size of the FlatText that will be made. Rather than using a default message, the FlatLeader tool will try to guess what you want it to say. This guess is displayed in screen text next to the point you first clicked. If FlatLeader has no guess, then its default message will be used.
This 'guessing the message' can be a very powerful tool for automatically displaying things like a group or component's name or type, the coordinates of a point, the length of a line, or the area of a face.
When you release or second-click, the FlatLeader is created.


A FlatLeader is located in 3D space like this: The FlatLeader group will face you (faces the camera), and its depth into the screen is set by where the first click (the tip of the arrowhead) is located. If you are using a top view, or are within 30 degrees of looking straight down, the FlatLeader is made parallel to the red-green plane.
Since FlatLeaders stay put, they will rotate along with the model, instead of always facing you as you orbit. For this reason, you should always be using Camera->Parallel Projection (not Perspective) and a saved camera angle (or standard view), if you want all of the FlatLeaders in a scene to face the same way.
Set View to FlatLeader: If for some reason you have made a FlatLeader with some random camera angle, such as annotating an off-axis isometric view, and forget to save the camera location in a scene, you can use this context menu command to reset the camera angle to look straight at the selected FlatLeader.
- Revise Leader: Use this command to change things in a FlatLeader. Select the FlatLeader you want to revise and call this command. You can also right-click on a FlatLeader to get this command in a context menu. Up comes a dialog box that's pre-loaded with the characteristics of your selected FlatLeader:

Here, you can change just about any aspect of your FlatLeader, as described in the illustration above. The best way to get a feel for this is to make a FlatLeader and then experiment with various settings.
NOTE: The text inside a FlatLeader is a full-fledged FlatText, so if you double-click a FlatLeader (open it for editing), you can then use all of the FlatText tools on the FlatLeader's text. My favorite trick is when I have a FlatLeader whose text is just a bit too long, I use the Squeeze tool on it.
Pro Feature "Multiple Revise": You can use this command on a selection of multiple FlatLeaders! The dialog box is pre-loaded with the properties of all the selected FlatLeaders. Only things that all the selected FlatLeaders have in common will be displayed with their values. Things that vary among the selected FlatLeaders will be pre-loaded with the word "varies." Any changes you make will be applied to all of the selected FlatLeaders. If you change one of the "varies" fields to a specific value, all the selected FlatLeaders will get that value. If you leave a "varies" field alone, that aspect of the selected FlatLeaders will not be changed.
- Adjust Leader: So your FLatLeader didn't end up right where you wanted it? No worries, just use this tool! Select the FlatLeader you want to adjust (or right-click on it) and call this command. You can grab the leader line at its three vertices:
- Arrowhead tip: Grab here to move the whole FlatLeader.
- Leader line "knee": Grab here to move the text around. You can even flip the text to the other side of the arrowhead, turning a left-pointing FlatLeader into a right-pointing one.
- Leader line end: Grab here to change the lead-in length. Handy for getting all your texts to line up just so.
The cursor will change as it finds each of the three "hot spots," so you know when to click and drag. See the FlatLeader Adjust video to see this tool in action, or just play around with it yourself.
- Find and Replace FlatLeader Text: This command works just like the FlatText version, except it only works on FlatLeaders.
- Leader Prefs: This command works just like the FlatText version. All the same features of the FlatText preferences machinery, including setting prefs from a selected FlatLeader (or right-click on one) and saving Custom Default Preferences from your model preferences.
- Save Prefs as Default: This is the command that sets up your Custom Default Preferences. It reads the model's preferences and writes them to a file named "FLprefs.txt".
- Preview Text Size... : On some High Resolution monitors, that bit of text that follows the cursor around during a Place operation can be really small and hard to read. Use this command to change the size of this preview text to something more readable. The default is 12 points, but you can make it 24 points, for example, to make it twice as large. Of course, if you think the preview text is too big, you can also make it smaller, like 9 points.
This is an application preference, so it will apply to all your models, not just the one you're working on at the time you set it.
Tips and Tricks
We use FlatText in our BIM workflow, designing HVAC and Plumbing systems for large buildings. Over the years, we've figured out some best practices:
Layers (Tags) and Scenes: Our models are set up with two sets of scenes. One set is for working on certain systems and/or areas of a project, and the other set is for output. We have dedicated layers for text that are used in all of the output scenes, and we put all the FlatText and FlatLeaders to be used on our output in those layers. We also use FlatText and FlatLeaders for in-house documentation and communication. That text typically goes in utility layers that are not used for output, or is left in Layer0 (untagged) so that it's always visible.
Font Controls File Size: FlatText glyphs can add up to a lot of edges. To keep your storage needs down and your rendering speeds up, use the simplest font that will do the job. DPArch might look cool for a sketch or rendering, but AHSimplex and DPSimple use far fewer edges. AHComplex and AHDuplex are good for titles and schedule headers, where words are few.
One trick you can do to keep files size down and yet have nice output is to work day-to-day with DPSimple. When it's time to produce some output, save a copy of the model, then substitute AHSimplex for all the DPSimple. These two fonts are identical in size, so there's no problem with text changing size and rewrapping lines. DPSimple is actually made from AHSimplex, but has about half the number of edges.
Since we're engineers, our drawings don't have to look as pretty, so we just use DPSimple all the time!
Tips to Improve Readability:
- Line Thickness: We use color to represent line weight, among other things. We use the PrettyPrint extension to set line weights and other parameters according to their colors when making PDFs. We like our text to be a medium-weight line (heavy weight for titles), our leader lines to be thin, and our arrowheads sharp. We set our default preferences to use certain colors for text, leaders and arrowheads that will translate to those line weights.
- Adjusting & Squeezing: We try to put notes where they don't get in the way of objects. Sometimes, especially with leader notes, you have to be creative about where you can put the note so that it won't block anything else. But long notes can be a pain to fit in small spaces. This is where Adjusting & Squeezing can be really handy. For a FlatLeader, you just double-click it to open it for editing, then select the FlatText with a single click. Now you can Adjust to get just the right line wrap, and maybe Squeeze the width down a bit too.
- Opaque Background: Sometimes, it's OK to block a bit of the underlying drawing. In my plumbing plans, I don't mind hiding a bit of wall or window, as long as I'm not blocking any of my piping. This is where opaque backgrounds are really handy. Set the background color to white (or whatever the color you like) and set the Background Width as desired. FlatTexts default to using Text Width, while FlatLeaders default to using Minimum Width. If you use a style where edges are rendered "All same" or "By axis" you will see a box around each note. If you use a style where edges are rendered "By material" the boxes will disappear - they're the same color as the background face.
That's all I have for now...
Your feedback is always welcome. If you have questions or suggestions, feel free to contact us.
Happy Texting!