
PrettyPrint
PDF Export on Steroids.

Get professional-looking PDFs directly from SketchUp Pro! PrettyPrint puts you in control of line color, width, and stroke shape for precise PDF output.
Combine PrettyPrint with FlatText™ and DPLineStyler™ to make precise, high quality line drawings without CAD or drawing software.
Get PrettyPrinting on the Extension Warehouse or the SketchUcation Plugin Store.
How It's Done
PrettyPrint takes the 2D PDF export of SketchUp Pro and "pretties up" the linework based on each line's color (Material) in SketchUp. This color-based collection of PDF output settings is called a "Lineset." You control the parameters of a Lineset with a "Living Legend" user interface that shows how each color line will print out.

Using PrettyPrint
Using PrettyPrint is similar to regular printing. First you specify a Setup, then you Print to PDF using that setup.
Where things are a bit different is in managing PrettyPrint's Linesets - those collections of PDF parameters that let you control things like line thickness and shape.
PrettyPrint has a complete set of tools to manage your Linesets. Once you get a Lineset adjusted just right, you can save it for use in other models. You can also store Linesets right in your model as graphical "Legends" so you know your model will print the same way every time.
Take a look at PrettyPrint's menus:

PrettyPrint Setup
This works like a typical Page Setup command. You specify your page size and which Lineset to use. You can also specify a scale for SketchUp's dashed lines here.

Printing to Scale
To control the exact scale of your PDF output, select "Parallel Projection" from the Camera menu. Set up the view, such as 'top' view for a floor plan. Draw a rectangle around your window's contents to represent the sheet of paper, or 'page.' The size of the PDF page divided by the 'real world' size of the page rectangle sets the scale.
For example: To make a 36x24 inch floor plan at quarter inch per foot scale: Draw a rectangle in the red-green plane that's 144 feet by 96 feet. Tell PrettyPrint Setup the page size is 36x24 inches. In the PDF, 36 inches will equal 144 feet, so one quarter inch equals one foot.

Just like SketchUp Pro's 2D PDF export, PrettyPrint will print everything that's visible in the main window. If you need to control the PDF's scale exactly, make sure there's nothing showing in your window that's outside of the page rectangle. In my workflow, I set up a scene for each page I want to print. The scene controls which tags are visible, places the camera, and zooms to the page rectangle. My page rectangle is usually a title block component, scaled as needed.
Now select Extensions>PrettyPrint>Print. You will get a "Save As..." dialog. Specify the name and location of your PDF file and hit OK. PrettyPrint does the rest. Open the resulting PDF file with a PDF viewer and admire the results.
Convert
New for version 2.1: The Convert command lets you "pretty up" PDF files that have already been exported from SketchUp.
To use the Convert command, do a Setup and position the image as you would for a Print command. Then, instead of using the Print command, use SketchUp's native PDF export command, File>Export>2D Graphic. Choose a filename and folder for the file, and be sure to select '.pdf' on the 'Format' pop-up menu.
After the PDF file is made, select the Convert command. Select the PDF file you exported and hit the 'Open' button. A Save dialog will appear with the PDF file's name with the word 'pretty' added. Edit this name if you want, select a folder, and hit the 'Save' button. PrettyPrint will use your Setup settings to convert the exported PDF file to a Pretty PDF.
For more about the Convert command, follow this link.
Managing Linesets
PrettyPrint has tools to create, open, edit, save, and delete Linesets. When a Lineset is open for editing, it is represented by a graphical "Legend" that lets you read and edit the various PDF parameters and see the results in sample shapes.
Making a New Lineset
Select Extensions>PrettyPrint>Linesets>New. Provide a name for your Lineset, and tell PrettyPrint which colors to gather to make the Lineset. Don't worry if your selection is not perfect; you can easily add or delete colors of your Lineset later.

Hit the OK button and PrettyPrint will make a new Legend of your Lineset. The Legend will be a SketchUp group in your model, untagged, in the ground plane (as defined by the red & green axes), with its upper-left corner at the origin.
Living Legends
All those PDF line parameters can require a lot of data. To make this task simpler, we invented the "Living Legend" user interface. A Living Legend is a SketchUp group of values and graphical objects made with FlatText™. You do NOT need to purchase FlatText, just install the free trial version 4.1.4 or later.
We call them "Living" Legends because they automatically update whenever you change their values. The Legend displays the parameters for each color in a Lineset, plus a sample of the resulting PDF output line. The sample updates itself as you edit the Legend's values. You can add or delete colors, change the Lineset's name, and save it for use on other projects.

You may move a Legend to any location in the model and change its tag as desired. You may also have as many Legends in a model as you like. In my models, I keep Legends for various scale drawings as well as for black & white and color printing. I tag them to be invisible in my printing scenes.
Editing
You can edit a Lineset's Legend using the PrettyPrint > Linesets > Edit command. When you select this menu command, a dialog box comes up:
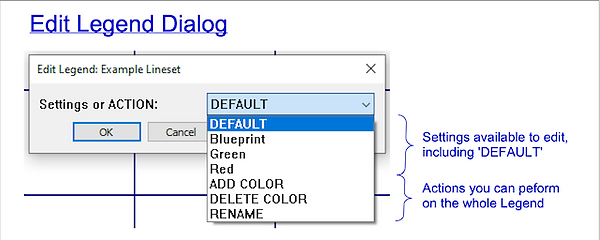
In this dialog, there's a drop-down menu with the names of the Legend's Materials (plus DEFAULT) in the upper part, and actions (in ALL CAPS) in the lower part. The actions are Add a color, Delete a color, and Rename. Select a Material name to edit that material's settings. When you are finished editing the Legend, click the Cancel button.
Editing a Material's Settings
If you select a Material name (or DEFAULT) from the Edit Legend dialog, you will get the Edit Settings dialog:

Here you can specify the PDF line's color, width, line cap, line join, and miter limit ("spikiness" factor - see explanation below). Any line whose color does not have a set of parameters will be rendered in PDF using the Default set.
The Width is the PDF 'printed' width of the line, regardless of the scale you are printing at. So when I'm printing at 1/16 inch scale, I may use a Lineset with thinner lines than I use at 1/4 inch scale. A Width of zero (0) is allowable and will render the thinnest possible PDF line.
Worth noting are the 'D' and 'I' options for settings.
- 'D' means use the value from the DEFAULT settings. Very handy if all you want to do is change one or two parameters and leave the rest alone.
- 'I' means use the Input material. A blue line in SketchUp prints to PDF with that same color of blue, for instance. Setting the DEFAULT color to 'I' and your other colors to 'D' means that each color's lines will print in their original color.

SketchUp's PDF 2D Export only makes lines with butt caps and no joins, so shapes drawn with them can look jagged where the line segments meet. PrettyPrint connects these line segments into continuous, smooth shapes, using the join style you specify. The resulting PDF output is sharp and precise, whether it's fine detail, a heavy border, or anything in between.

But Wait, There's More!
Other commands in the Lineset menu:
- Open: Use this command to open one of your saved Linesets. A new Legend will be made from the Lineset file, ready for editing.
- Refresh: Use this command if you think the Legend should be redrawn. For example, you might have changed the name of a material in your model and want that name to update in the Legend.
- Save: Write the current Legend to a Lineset file.
- Delete: Throw away a Lineset file that you no longer need. But use caution - this command cannot be undone!
Other commands in the PrettyPrint menu:
- Color Select: The cursor changes to a rainbow arrow with a question mark. Now you can see the material name of anything in your model by mousing over it. Then click to add that color to a Legend. To exit the Color Select tool, hit the space bar or select a different SketchUp tool.
- About...: Shows you the version of PrettyPrint and offers a button to take you to this web page.
- License...: Shows you the status of your PrettyPrint license.
- Preferences...: Allows you to change the colors of your Legends' linework and text. Also lets you change the size of the Material names displayed by the Color Select tool.
A Deeper Dive
Round Rocks!
Sometimes you need a nice square-ended stroke with neat mitered joins. But more often, a round-ended stroke with round joins is the way to go. It looks as good or better for most uses, and is much faster to render.
Smoothing out the "jaggies" takes a lot of computing horsepower. Lines with Round caps and Round joins don't need this smoothing procedure, so PrettyPrint can run much faster.
Some shapes, such as vector fonts, were designed for round pens and can look downright weird if they're rendered with miter joins!
So, what's a Miterlimit, anyway?
Here's a graphic I made to describe it:

Why Convert?
So why should you Export and Convert instead of simply using Print? It works around a weird bug I found while testing PrettyPrint 2.0 on Windows.
I was testing PrettyPrint on one of my old work files that included a complicated floor plan that was originally exported from Revit™. The Print command worked just fine, but when it was done, the SketchUp window was full of weird junk instead of its usual display. There was no harm done to either the file or to SketchUp and the resulting PDF file looked just as it should, but SketchUp's graphics were toast. I had to quit and restart SketchUp to get the main window working again. Not an ideal workflow!
This never happened in PrettyPrint 1.0, and it does not happen in PrettyPrint 2.0 on Mac, just on Windows. When I tried exporting a PDF file using SketchUp's 'File>Export>2D Graphic' command on this test file, the file exported normally and the graphics were unaffected. And when I applied the PrettyPrint magic to the exported PDF, it came out looking as it should (awesome). So the Convert command was born.
I plan to keep trying to fix this. In the meantime, if you get the weird graphics problem when you try to use Print, the Convert command will give you a usable workaround. Sorry for the inconvenience!
Feedback Welcome
Take PrettyPrint for a spin and tell us what you think.
Use our Contact Us form to tell us what you like or don't like, how it could help your workflow, what would make it even better.
Happy Printing!